CI/CD for Databases on CircleCI - Declarative Workflow
CircleCI is a popular CI/CD platform that allows you to automatically build, test, and deploy your code. When used with Atlas, it lets you validate and plan database schema changes as part of your regular CI process, keeping updates predictable and safe as they move through your pipeline.
In this guide, we will demonstrate how to use CircleCI and Atlas to set up CI/CD pipelines for your database schema changes using the declarative migrations workflow.
Prerequisites
Installing Atlas
- macOS + Linux
- Homebrew
- Docker
- Windows
- CI
- Manual Installation
To download and install the latest release of the Atlas CLI, simply run the following in your terminal:
curl -sSf https://atlasgo.sh | sh
Get the latest release with Homebrew:
brew install ariga/tap/atlas
To pull the Atlas image and run it as a Docker container:
docker pull arigaio/atlas
docker run --rm arigaio/atlas --help
If the container needs access to the host network or a local directory, use the --net=host flag and mount the desired
directory:
docker run --rm --net=host \
  -v $(pwd)/migrations:/migrations \
  arigaio/atlas migrate apply \
  --url "mysql://root:pass@:3306/test"
Download the latest release and move the atlas binary to a file location on your system PATH.
GitHub Actions
Use the setup-atlas action to install Atlas in your GitHub Actions workflow:
- uses: ariga/setup-atlas@v0
  with:
    cloud-token: ${{ secrets.ATLAS_CLOUD_TOKEN }}
Other CI Platforms
For other CI/CD platforms, use the installation script. See the CI/CD integrations for more details.

After installing Atlas locally, log in to your organization by running the following command:
atlas login
Creating a bot token and CircleCI context
To report CI run results to Atlas Cloud, create an Atlas Cloud bot token by following these instructions and copy it.
Next, we'll create a CircleCI context to securely store environment variables that will be shared across jobs:
- In CircleCI, go to Organization Settings -> Contexts
- Click Create Context and name it
dev(this matches the context used in our example configuration) - Click on the newly created
devcontext - Add the following environment variables:
ATLAS_TOKEN: Your Atlas Cloud bot token (how to create) - requiredDATABASE_URL: The URL (connection string) of your target database (URL format guide) - requiredGITHUB_TOKEN: GitHub personal access token withreposcope (how to create) - optional, needed for PR commentsGITHUB_REPOSITORY: Your GitHub repository in the formatowner/repo(e.g.,ariga/atlas) - required for PR comments
Using a context allows you to manage these sensitive variables in one place and reuse them across multiple projects and workflows.
Offline Access
The Atlas CircleCI Orb includes built-in grant caching and restore logic (.atlas) so Atlas Cloud is not a single point of failure in your CircleCI workflow.
No additional cache setup is required when using the official Atlas orb commands.
Declarative Migrations Workflow
In the declarative workflow, developers provide the desired state of the database as code. Atlas can read database schemas from various formats such as plain SQL, Atlas HCL, ORM models, and even another live database. Atlas then connects to the target database and calculates the diff between the current state and the desired state. It then generates a migration plan to bring the database to the desired state.
In this guide, we will use the SQL schema format.
The full source code for this example can be found in the atlas-examples/declarative repository.
Our goal
When a pull request contains changes to the schema, we want Atlas to:
- Compare the current state (your database) with the new desired state
- Create a migration plan to show the user for approval
- Mark the plan as approved when the pull request is approved and merged
- Use the approved plan to apply the changes to the database during deployment
Creating a simple SQL schema
Create a file named schema.sql and fill it with the following content:
CREATE TABLE "users" (
  "id" bigserial PRIMARY KEY,
  "name" text NOT NULL,
  "active" boolean NOT NULL,
  "address" text NOT NULL,
  "nickname" text NOT NULL,
  "nickname2" text NOT NULL,
  "nickname3" text NOT NULL
);

CREATE INDEX "users_active" ON "users" ("active");
Then, create a configuration file for Atlas named atlas.hcl as follows:
variable "database_url" {
  type        = string
  default     = getenv("DATABASE_URL")
  description = "URL to the target database to apply changes"
}

env "dev" {
  url = var.database_url
  dev = "docker://postgres/15/dev?search_path=public"
  schema {
    src = "file://schema.sql"
    repo {
      name = "circleci-atlas-action-declarative-demo"
    }
  }
  diff {
    concurrent_index {
      add  = true
      drop = true
    }
  }
}
Pushing the schema to Atlas Cloud
To push our initial schema to the Schema Registry on Atlas Cloud, run the following command:
atlas schema push circleci-atlas-action-declarative-demo --env dev
This command pushes the content linked in the schema src field in the dev environment defined in our atlas.hcl to a project in the Schema Registry called circleci-atlas-action-declarative-demo.
Atlas will print a URL to your schema on Atlas Cloud. You can visit this URL to view your schema.
Setting up CircleCI
Create a .circleci/config.yml file in the root of your repository with the following content:
version: 2.1

orbs:
  atlas-orb: ariga/atlas-orb@0.3.1

jobs:
  plan-schema-changes:
    docker:
      - image: cimg/base:current
      - image: cimg/postgres:15.0
        environment:
          POSTGRES_DB: postgres
          POSTGRES_USER: postgres
          POSTGRES_PASSWORD: postgres
    steps:
      - checkout
      - run:
          name: Wait for Postgres
          command: dockerize -wait tcp://127.0.0.1:5432 -timeout 60s
      - atlas-orb/setup:
          version: "latest"
      - atlas-orb/schema_plan:
          env: dev
          dev_url: postgres://postgres:postgres@localhost:5432/postgres?sslmode=disable&search_path=public

  deploy-schema-changes:
    docker:
      - image: cimg/base:current
      - image: cimg/postgres:15.0
        environment:
          POSTGRES_DB: postgres
          POSTGRES_USER: postgres
          POSTGRES_PASSWORD: postgres
    steps:
      - checkout
      - run:
          name: Wait for Postgres
          command: dockerize -wait tcp://127.0.0.1:5432 -timeout 60s
      - atlas-orb/setup:
          version: "latest"
      - atlas-orb/schema_plan_approve:
          env: dev
          dev_url: postgres://postgres:postgres@localhost:5432/postgres?sslmode=disable&search_path=public
      - atlas-orb/schema_push:
          env: dev
          dev_url: postgres://postgres:postgres@localhost:5432/postgres?sslmode=disable&search_path=public
      - atlas-orb/schema_apply:
          env: dev
          dev_url: postgres://postgres:postgres@localhost:5432/postgres?sslmode=disable&search_path=public

workflows:
  version: 2
  atlas-workflow:
    jobs:
      - plan-schema-changes:
          context: dev
          filters:
            branches:
              ignore: main
      - deploy-schema-changes:
          context: dev
          filters:
            branches:
              only: main
dev_url configurations?Our atlas.hcl file contains a dev_url configuration that points to a Docker container:
dev = "docker://postgres/15/dev?search_path=public"
This works locally where Docker-in-Docker is supported. However, CircleCI Docker images don't support Docker-in-Docker.
By adding the dev_url parameter to all relevant commands (schema_plan, schema_plan_approve, schema_push, and schema_apply), we override the atlas.hcl configuration and point to the PostgreSQL service container running at localhost:5432 in the CI environment. While some commands may not strictly require dev_url, we provide it to all for consistency and to avoid configuration issues.
The environment variables we configured in the CircleCI context (ATLAS_TOKEN, DATABASE_URL, GITHUB_TOKEN, GITHUB_REPOSITORY) are automatically available in all jobs that use the dev context. These variables are securely managed by CircleCI and don't need to be specified in individual jobs.
This configuration uses main as the default branch name. If your GitHub repository uses a different default branch (such as master), update the workflow filters accordingly:
filters:
  branches:
    only: master  # Change to match your default branch
Let's break down what this pipeline configuration does:
- The
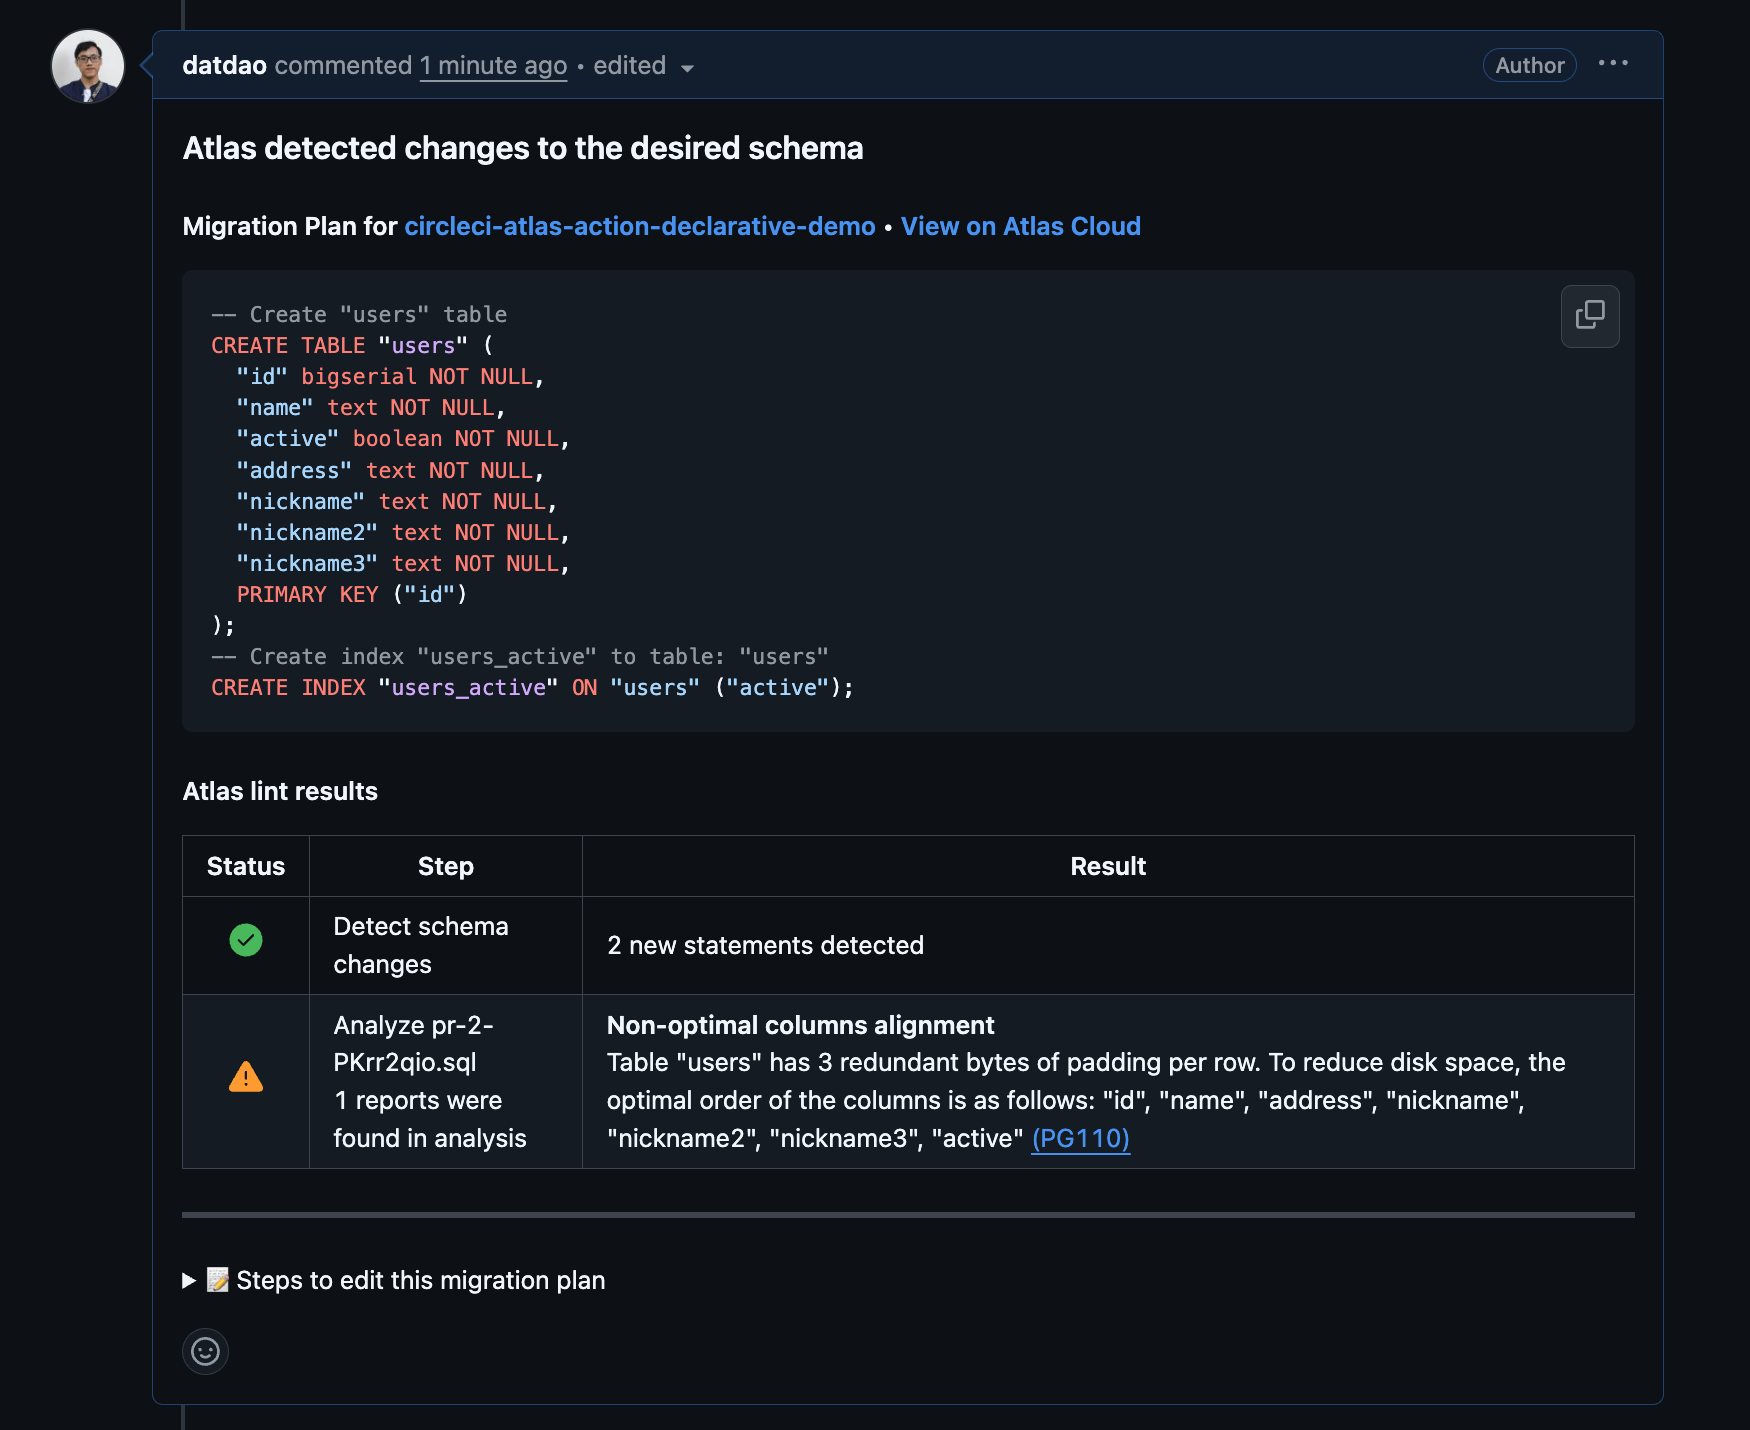
plan-schema-changesjob runs on every pull request (branches that are notmain). Atlas generates a migration plan showing the changes needed to move from the current state to the desired state, and posts it as a comment on the pull request.
- After the pull request is merged into the main branch, three things happen: First, the plan created in the pull request is approved by the
schema_plan_approvestep. Second, theschema_pushstep pushes the new schema to the Schema Registry on Atlas Cloud. Finally, theschema_applystep applies the changes to the database.
In this example, we use schema_apply to apply changes to the same test database that we used for planning. In a production environment, you would typically:
- Set up a separate production database with its own
DATABASE_URLin a production context - Run the
schema_applystep against your production database - Consider using deployment approvals for additional control
Testing our pipeline
Let's see our CI/CD pipeline in action!
Step 1: Make a schema change
Let's modify the schema.sql file to drop the index we created earlier:
CREATE TABLE "users" (
  "id" bigserial PRIMARY KEY,
  "name" text NOT NULL,
  "active" boolean NOT NULL,
  "address" text NOT NULL,
  "nickname" text NOT NULL,
  "nickname2" text NOT NULL,
  "nickname3" text NOT NULL
);
Now, let's commit the change to a new branch, push it to GitHub, and create a pull request.
The plan-schema-changes job will use Atlas to create a migration plan from the current state of the database to the new desired state.
There are two things to note:
- The comment also includes instructions to edit the plan. This is useful when the plan has lint issues (for example, dropping a column will raise a "destructive changes" error).
- The plan is created in a "pending" state, which means Atlas can't use it yet against the real database.
Merging the changes
Once you're satisfied with the plan, merge the pull request. A new pipeline will run with the remaining steps:
- The
schema_plan_approvestep approves the plan that was generated earlier - The
schema_pushstep syncs the new desired state to the schema registry on Atlas Cloud - The
schema_applystep applies the approved changes to the database
Wrapping up
In this guide, we demonstrated how to use CircleCI with Atlas to set up a modern CI/CD pipeline for declarative schema migrations. Here's what we accomplished:
- Automated schema planning on every pull request to visualize changes
- Centralized schema management by pushing to Atlas Cloud's Schema Registry
- Approval workflow ensuring only reviewed changes are applied
- Automated deployments using approved plans
For more information on the declarative workflow, see the Declarative Migrations documentation.
Next steps
- Learn about Atlas Cloud for enhanced collaboration
- Explore schema testing to validate your schema
- Read about versioned migrations as an alternative workflow
- Check out the CircleCI Orbs reference for all available actions
- Understand the differences between Declarative vs Versioned workflows